Give internal and external collaborators and partners secure and seamless access to your media library by adding Invited Users and creating Invited User Groups with a PhotoShelter for Brands digital asset management account.
According to Hubspot’s 2021 State of Marketing, 82% of companies reported using content marketing more in 2022 compared to 2020 (a 12% increase!) to further their brand strategy and connect with their customers.
So, what holds brands back from instantly engaging in the moments that matter most?
A lack of resources, operational processes, media organization, and miscommunication between internal and external stakeholders.
To tackle the lack of financial overhead needed to hire a full-time team of creatives, brands often hire teams of external collaborators.
According to Digiday, “Content creation agency Verblio surveyed more than 400 content marketers working in-house, at agencies, and as freelancers to get insights on the state of digital content in 2022. The results showed 71% of in-house marketers and 68% of agencies are outsourcing their content needs to freelancers.”
Plus, if your organization or brand works with sponsors or marketing partners, sharing content with external partners and collaborators can quickly lead to a perfect storm: chaotic communication, overwhelming ad-hoc requests, and ultimately, a confused visual brand identity.
To get everyone, including your external collaborators and partners, on the same page using PhotoShelter for Brands is simple: add them as Invited Users or create Invited User Groups.
Keep reading below to learn how to add Invited Users, how to create Invited User Groups, and how to clearly define roles in your PhotoShelter for Brands Library for your staff and partners. That way, workflows are simple and easy to follow and understand.
How to Add Invited Users
A few quick important things to note before you get started:
- Admins and Editors are the only PhotoShelter for Brands user types that can add Invited Users and create Invited User Groups. Taggers do not have this ability. Click here to learn more about what different user roles can and can not do in PhotoShelter.
- Invited Users will never see your full media library unless you want them to. They only have access to assets in your organization’s Portal which is a public website that displays your PhotoShelter for Brands DAM content. The most common URL structure for a brand’s PhotoShelter for Brands Portal is: https://yourorganization.photoshelter.com.
- Lastly, when you add an Invited User, you can choose the access they have to the assets in your Portal. Select and set permissions on individual Collections and Galleries to give your Invited Users access to view, upload, or download files in your Portal.
Admins and Editors of a PhotoShelter for Brands account, this is how you add an Invited User in three steps:
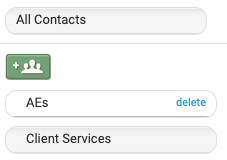
- Log in to your PhotoShelter for Brands Library, click ‘Admin’ from the top menu, and select ‘Invited Users’ from the dropdown that appears.
- Your page will automatically refresh to the Invited Users management page and from here, you will click the green button in the center pane (pictured below) to add an Invited User.
- A pop-up window will display asking you to Add a contact. Enter the person’s information that you want to add as an Invited User, then click the green ‘Submit’ button.


Congratulations! You’ve added your first Invited User! That person will receive an email notifying them of their new access to your Portal.
Pro Tip: Speed up the process by importing contacts from Google or Yahoo!
Don’t think you’ll have time to add Invited Users individually? No problem. Just import a contact list from a Google or Yahoo! Account or upload a CSV file with your contacts’ information. Read our Support Center article to learn the simple five-step process.
How to Create Invited User Groups
When it comes to doing a task at work, would you rather do it once or do the same thing 20 times in a row? Instead of setting individual permissions for each new Invited User, set the same permissions for a group of users who need the same level of access to your brand’s content.
How do you figure out who to put in a User Group? Great question!
Some organizations create User Groups for different internal departments, some create User Groups for freelance creative contributors or interns, and some create User Groups for partners, sponsors, and media contacts.
Remember: It’s best if you create User Groups for people who should have the same level of visibility and download access to your Portal content because all of those people will be able to do and see the same things.
Admins and Editors, this is how you create a User Group in three steps:
- On the same Invited User management page, you’ll notice a green button in the left pane that has an icon that looks like a group of heads. Click the green button at the top of the left pane to create a new User Group.
- Once the dialogue window pops up, name the new User Group.
- After you successfully create a User Group, you can add Invited Users to it. Drag and drop Invited Users from the center pane into the groups in the left pane.


Note: When you select a User Group in the left pane a list of all its members will appear in the center pane.
Frequently Asked Questions About Invited Users and User Groups
- Can I delete an Invited User? If you’re no longer working with a team member or collaborator of any kind, you can (and should!) remove access to your brand’s assets by selecting their name under ‘All Contacts,’ clicking ‘Actions’ in the sub-navigation bar, and selecting ‘Delete.’
- Can I edit the contacts in a User Group? Yes! Hover over the user group and edit each contact as you wish. Read more about how to do this in our Support Center article.
- How do I delete a User Group? First, think twice before you do it! Deleting a User Group means none of those contacts will have access to your content. Are you sure? Okay! Simply hover over the User Group selection of your choice and click the blue ‘delete’ button.
Get More Workflow Hacks!
Sign up for our customer newsletter to receive platform updates and all the pro tips you’ll ever need to work smarter, not harder!
If your organization hasn’t invested in digital asset management yet, start here to learn how we might help your team and organization save time and money by speeding up your brand’s marketing and communications operations.