[VIDEO] Tour PhotoShelter’s Access Control and Content Collaboration
Learn how to share content, manage permissions, and update visibility and access settings in the PhotoShelter Library.
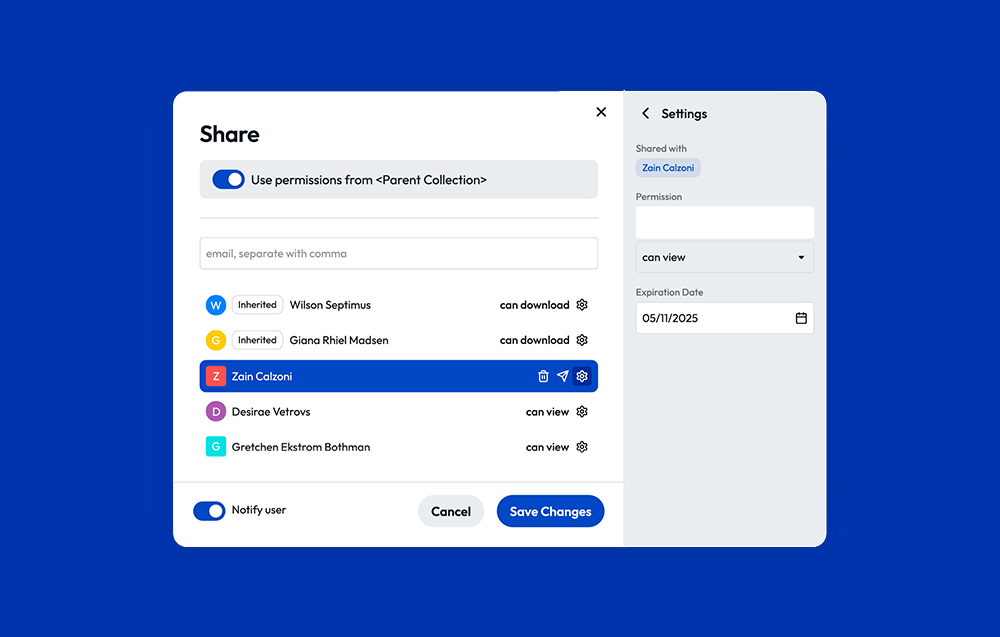
Share
Once you upload files to PhotoShelter, it’s important to control who can access them.
Permissions are settings that determine who can see and use your files. Only Admins and Editors can set permissions, which can be customized for each Collection or Gallery. These settings control who can access files on your public Portal.
Typically, internal teams have more access, while partners, collaborators, or the public have limited or no access. Customize permissions to fit your organization’s specific needs.
Visibility Settings
Visibility settings control who can see a Collection or Gallery on your Portal. You can choose from three options:
Public: Anyone can view this Collection/Gallery on your Portal.
Those with permission: Only invited users or groups can view this Collection/Gallery.
Private: Only visible in the Library to staff members, not listed on your Portal.
Icons on the folder indicate visibility:
Empty circle = not shared (used to be red)
Yellow/Orange = shared with some people
Green = publicly visible
Access Settings
Access settings determine if users can download files from a Collection or Gallery. You have three options:
Specific Users: Invite individuals or groups to access content. Users log in with an email and password or Single Sign-On.
Password: Requires a password for viewing or downloading content. Only the IP address is recorded.
Any Portal Visitor: Allows anyone to view or download public content. Only the IP address is recorded.
Set Download Permissions
Decide what kind of downloads you want to allow for each file type:
Image Download Type: Sets maximum size/resolution for image downloads.
Video Download Type: Sets maximum size/resolution for video downloads.
Note: The original files in your Library remain unchanged; only downloaded files are converted to the specified size.
Save Time with Inheritance
Each Collection and Gallery has its own permissions. Use inheritance to apply the same settings from a parent Collection to its nested Galleries. This saves time and ensures consistency across your files.
Control Your Content with Ease
Setting permissions and visibility are key to managing your PhotoShelter account. Customize these settings to ensure everyone has the right level of access, helping you save time and manage your content efficiently.
Haven’t started with digital asset management yet? Schedule a demo today to improve your workflow and save time and money.